
How To Set Up Hello Baby Monitor In 2023 – Step-By-Step Guide
- Ejaz
- Last Updated | January 7, 2023
Hello Baby Monitor is affordable and an extremely easy to use baby monitor that will help parents and babies stay connected. Before using this baby monitor, make sure the battery is fully charged. In this guide, I will explain how to set up hello baby monitor and pair the camera and parent unit.
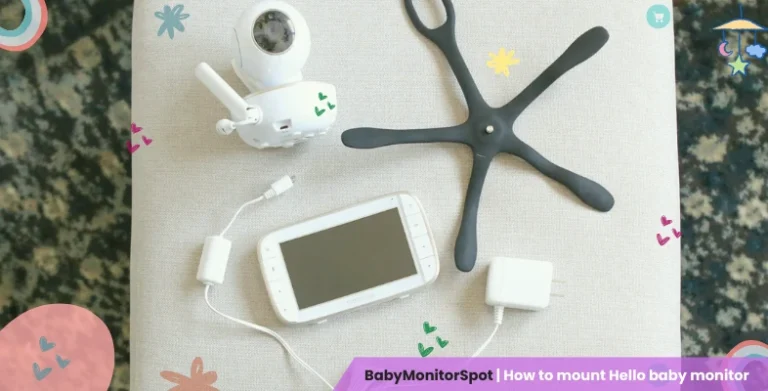
Be sure that you receive all these things in your package box:
- 1 parent unit
- 1 camera unit
- 2 power adaptors
- Users guide
- 1 wall mount kit
Guideline For Set Up Hello Baby Monitor
To use your parent unit and camera unit together, you must establish an RF (radio frequency) link between them, and environmental conditions will affect the range.
Metal objects, such as refrigerators, mirrors, filing cabinets, metallic doors, and reinforced concrete can interfere with the radio signals of baby monitors.
Walls, TVs, and other electronic devices reduce the wireless signal. You can use an antenna to increase movement.
Baby monitors should be kept from other 2.4 GHz devices because they might interfere with each other and cause problems. You can stop baby monitor interference by turning them off if you see interference and trying a new place for the baby monitor.
The Proper Place For The Camera Unit:
A baby monitor should always be placed away from heat sources and other devices emitting radio waves like TV. You have to properly mount your baby monitor.
There are many places in the baby room where you can mount the baby monitor. For example, you can mount the baby monitor to the crib or mount it on the wall without drilling. Choose the place according to your need.
Turn On The Parent Unit:
- Use the 6V, 600mAh battery pack included in this package.
- Charge the battery in your parent unit enough to last at least 12 hours before use. It’s best if the batteries are fully charged.
- Insert the other end (the positive) of the power adaptor (with the black connector) into a suitable electrical outlet (with an earth ground).
- While holding the power button on the top of the Parent Unit, the battery status indicator will light, indicating that the Parent Unit is plugged into an electrical outlet.
Turn On The Camera:
You need to use the 5V, 1A power adapter included in this package. Plugin the camera unit’s power adapter into the DC socket. Plug the other end of the charger into an appropriate electrical socket.
After connecting the adapter, the power LED will turn on the camera. You can hide the baby monitor camera in multiple ways. For example, you can hide the baby camera behind a picture, place it in a high place, and hide it in the soft baby toy.
Paring The Camera And Parent Unit:
A registered baby unit does not require registration when it changes units. It means there is no longer any need to register the baby and parent units. Some baby units are pre-registered with parent units.
- Press the Menu button then the menu will appear.
- Press the ◀ (camera) key or the ▶ (record button) key until the camera icon appears, then press the ▲ (stop) key or the ▼ (play) key to start recording.
- Choose a camera from among the options available.
- Pressing the “OK” key will take you to the next menu.
- Press the “Add Camera” button (▲) and then press the “OK” button (▼).
Alarm Setting:
As long as you’re using the Parent Unit as a timer, you can set the alarm as a reminder for yourself to take care of your kid.
A parent unit that tells you when it needs attention. You can set the alarm at any time during those specified hours. An alarm sounds every hour for one minute. Pressing a button stops the alarm.
Infrared Night Vision:
Infrared night vision functions allow the camera to pick up objects in pitch-black conditions, but only in black and white format. A safe distance of 6 feet should be maintained when using this feature.
Safety Instructions During The Set Up Hello Baby Monitor
Strangulation Hazard:
Extension cords should be kept far from children (more than 3 feet). A child could strangle themselves when using an extension cord. Extension cords should never be used with an adapter.
After one year, you should know how to deal with your baby’s crying. You know when your child needs help or when not.
Choking Hazard:
This monitor may contain small pieces. Carefully read the instructions before using this hello baby monitor. Do not use near fire or flame.
Read And Apply Instructions:
Baby monitors are meant to help parents supervise their children while they sleep. Read and follow all instructions carefully before using the Hello monitor.
Avoid Water And Moisture:
The hello monitor should be kept away from direct contact with water. Items filled with liquid should not be put on top of or beside this monitor. Do not place any glass or vases on the monitor.
Ventilation:
Baby monitors should not be used on beds, sofas, rugs, etc. These items could obstruct the ventilation holes and prevent airflow. Also, baby monitors shouldn’t be placed inside closed areas, such as bookshelves and drawers, because this may hinder air circulation.
Keep Away From Heat Sources:
It could be hazardous if the baby monitor is exposed to direct sunlight or heat sources. So keep the baby monitor away from all types of heat sources.
Power Source:
A power adapter is included as part of the baby monitor’s kit. You must use an adapter that provides your device’s correct voltage and current rating. For example, if you’re using a 3.7V battery pack, the power supply must provide 5V or more.
Damage Requiring Repair:
This unit should be repaired by qualified personnel only if:
- Falling objects or liquids have damaged the monitor from above.
- The monitor has been subjected to rainwater.
- The units don’t seem to be operating normally or exhibit a distinct change in performance.
Do not use the hello baby monitor if the cord or the power plug is damaged. Hello, Baby Service Center will inspect the device and fix it. After fixing all the cords you must baby proof electric cord and also hide all the baby monitor cords properly. So your baby safely moves around.
Do not attempt to fix anything on this monitor! It is an electronic waste disposal monitor. You’ll get electrocuted if you make any adjustments.
How long does it take to charge a Hello baby monitor?
Hello baby monitor takes about 2 to 3 hours to charge fully. You need to plug it into the wall overnight, and it’s ready for the afternoon nap.
Where is the reset button on the Hello baby monitor?
The reset button is located on the backside of the unit. You need to turn the parent unit off by pressing the power button on top of the unit. Then press the button on the bottom of the parent unit to reconnect the camera and monitor.
Conclusion
Hello Baby Monitor is an excellent choice for those who want a versatile, easy-to-use, low-cost solution. The most crucial thing after purchasing is setting up and connecting the camera and parent unit. I have explained how to set up a hello baby monitor, and if you have any suggestions regarding this guide, don’t forget to tell me in the comment box section. Thank You!
Latest Posts


2 thoughts on “How To Set Up Hello Baby Monitor In 2023 – Step-By-Step Guide”
I’m sorry, I did not see any where that you told me how all the features work.
Thank you!!
Ohoo! This is a setup guide. Soon I will publish a detailed guide on the hello baby monitor. It will help you a lot. Would you like to mention a specific model I will add it too. Thanks for reading & comment.